How Can We Help?
Retargeting – Transferring Animation
Retargeting is the process of transferring animation from one character on to another. Usually this requires the same skeleton as most retargeting systems cannot handle variations in the skeleton topology. Even if they do, they are limited to a single category of characters such as humanoids with manual tedious mapping of the skeletons based on a predefined template.
MotionMuse presents an easy to use retargeting system, though it cannot handle all cases, it far more versatile, quick and easy to use than existing solutions. To start, open the “Retargeting” tab and familiarize yourself with the various buttons and options show below.
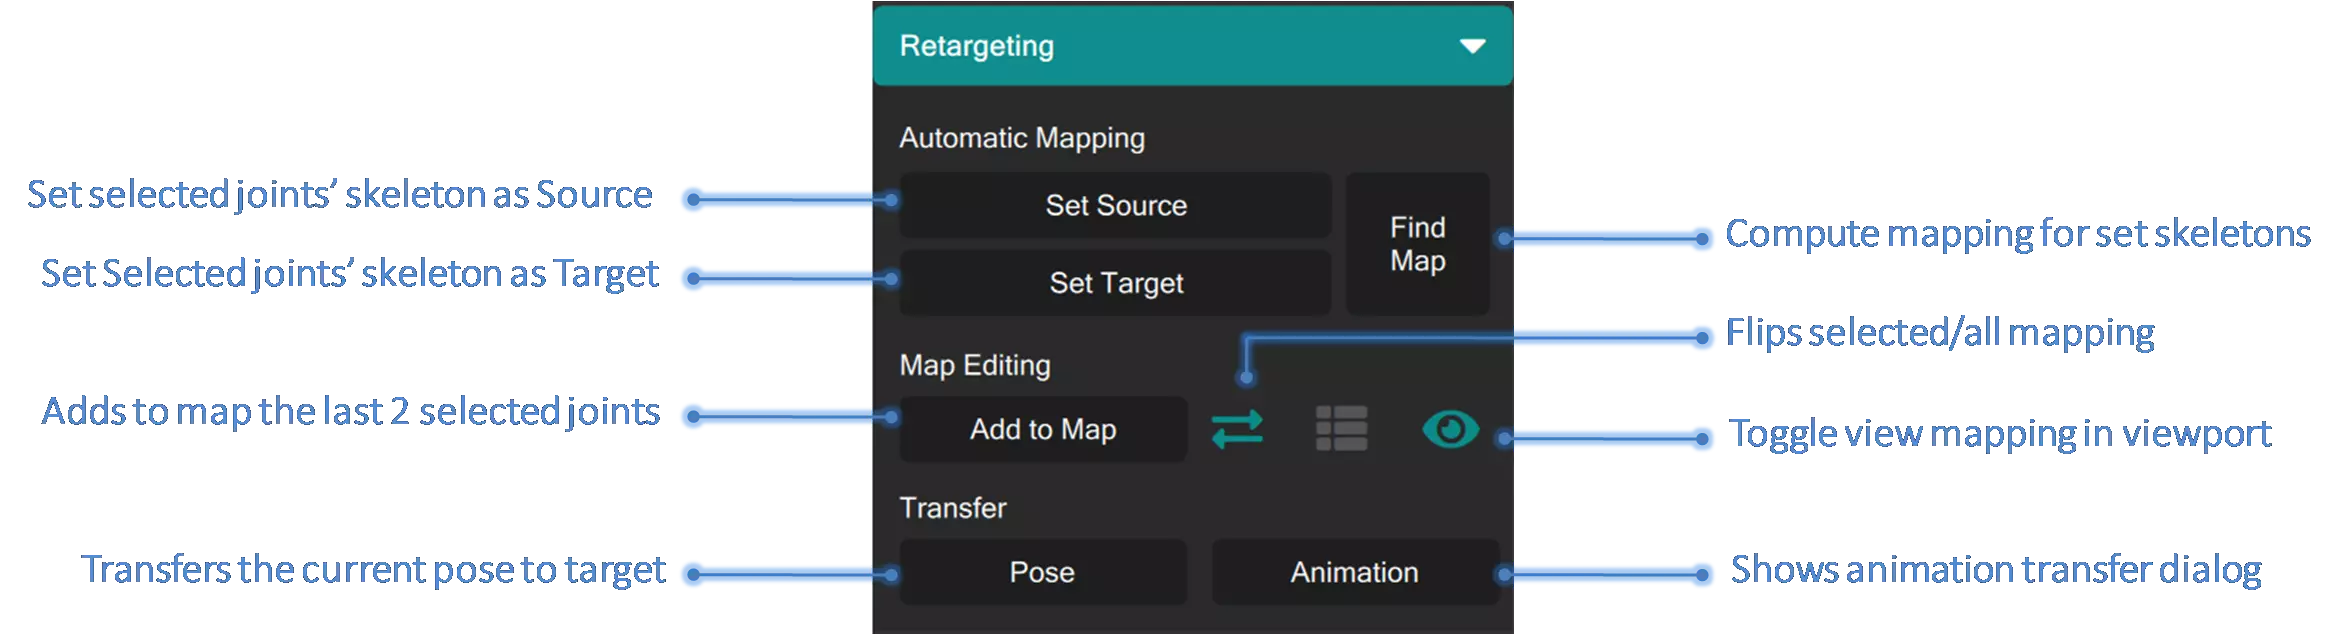
To retarget you’ll have to import at least 2 characters in the scene. After importing the characters select any number of Joints in the 1st character and press the “Set Source” button, this will set the character’s skeleton as the source. The name of the skeleton will appear on the button to indicate it has been set. Similarly, select a few joints in the target skeleton and press the “Set target” button to set the target skeleton.
To find a mapping between the source and target skeletons, press the “Find Map” button, a mapping with green and orange diamonds will appear in the viewport as shown below.
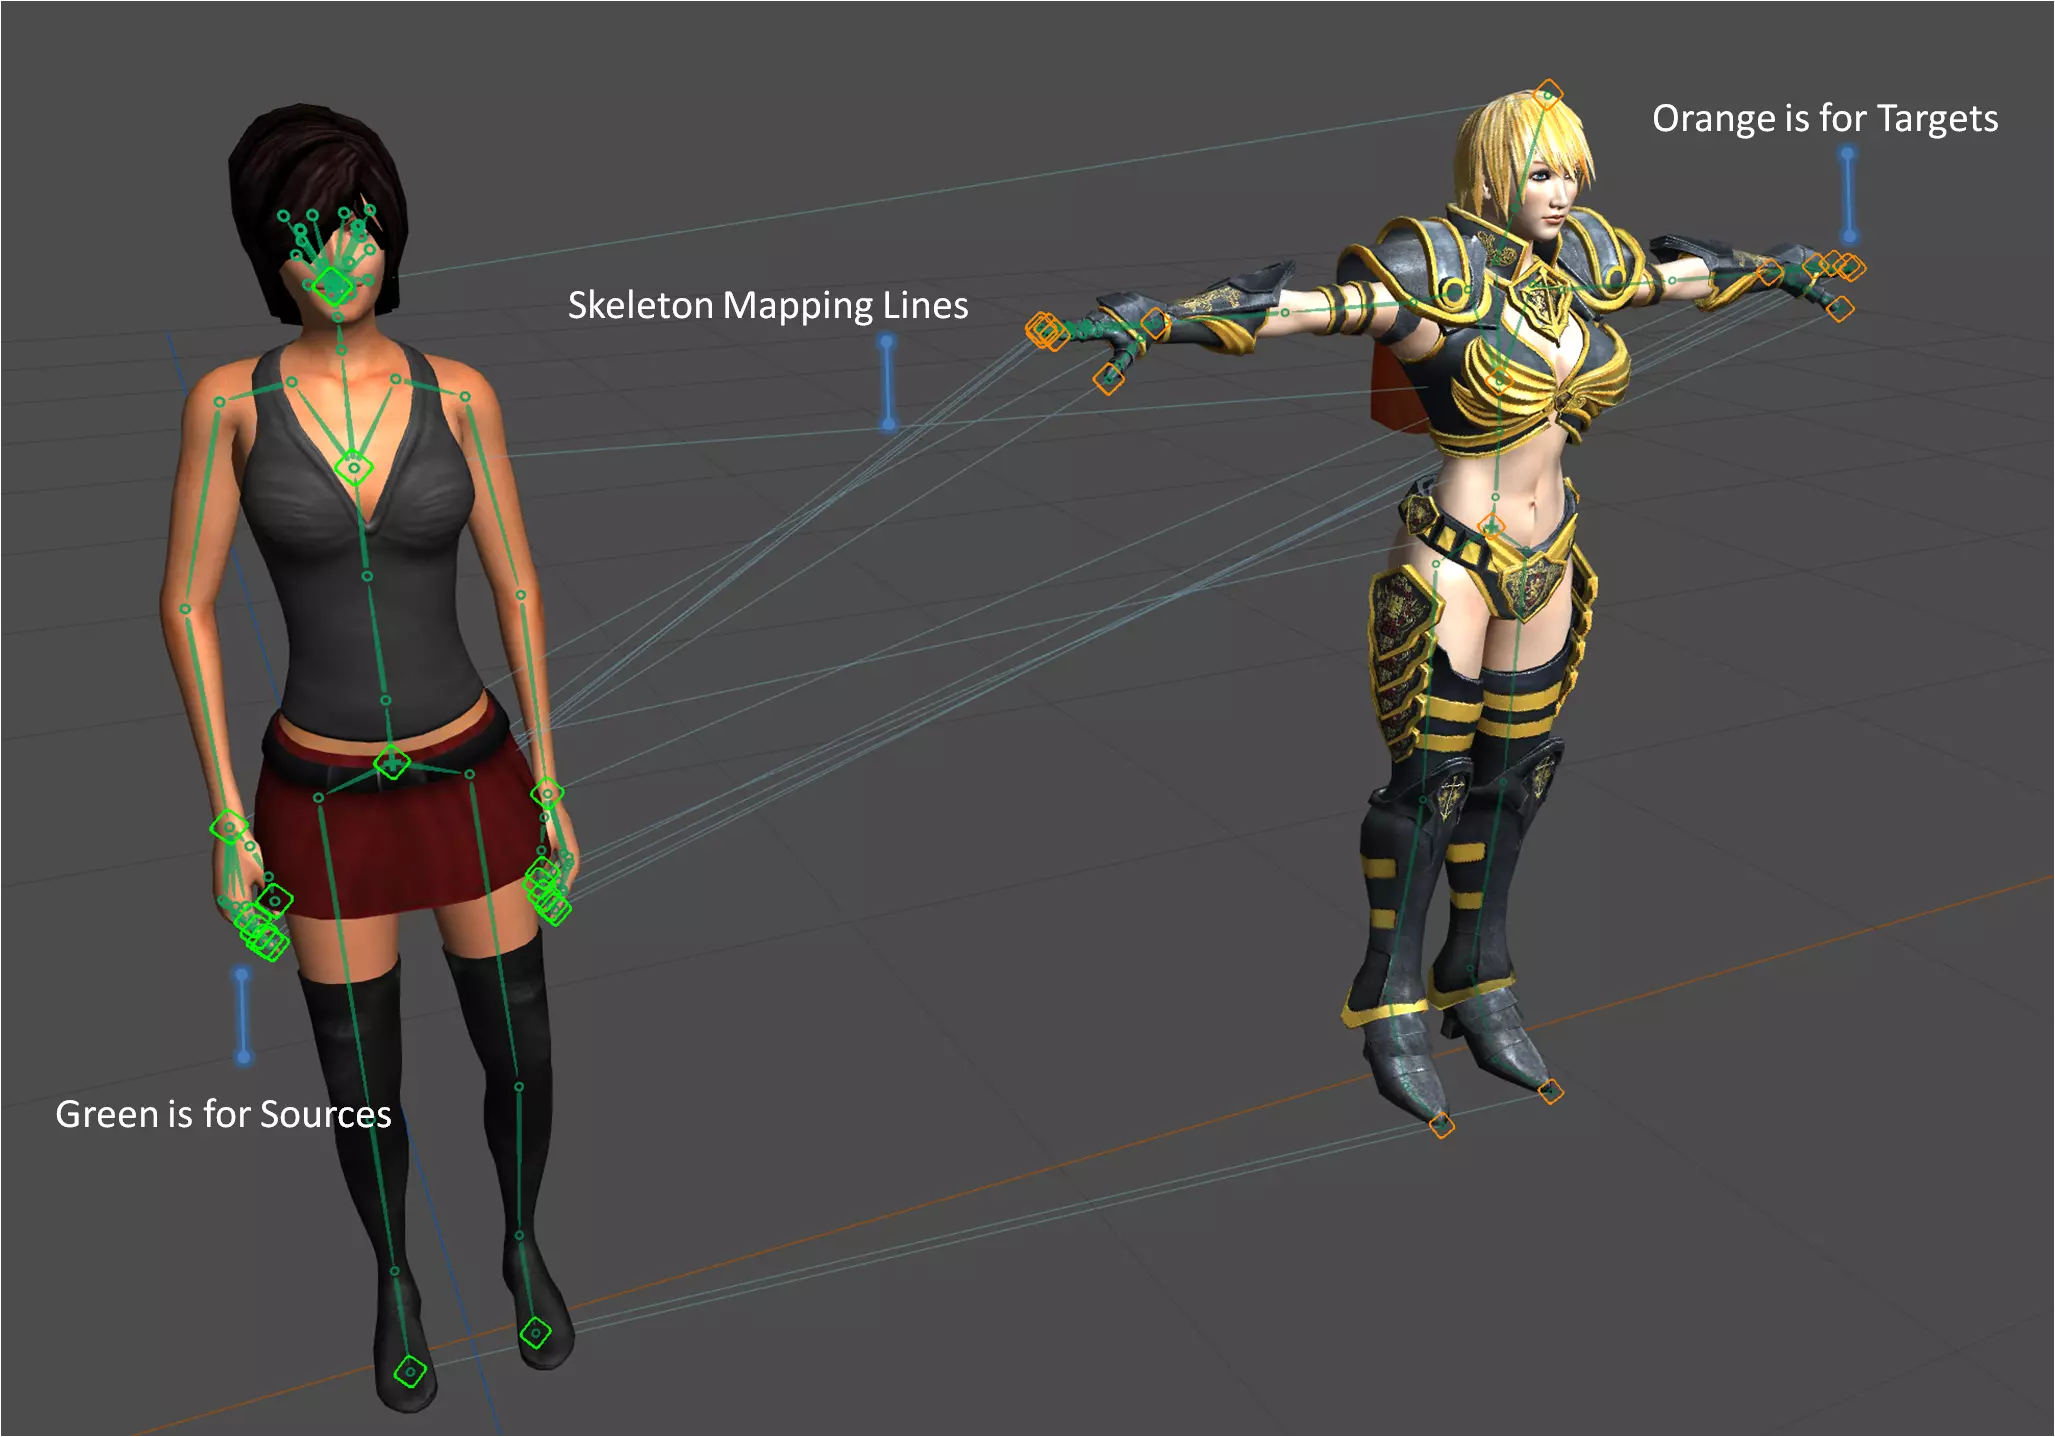
The lines indicate what part of the source skeleton maps to what part of the target skeleton making it easier to visually see / edit the map. If you are not satisfied with the mapping; each map line and/or its end points can be independently adjusted to fine tune the mapping. The end points will snap to the closest joints upon release to facilitate quick adjustments.
Once satisfied with the mapping, choose and press the “Pose” button under the Transfer heading; this will transfer the current pose of the source skeleton to the target. This is a handy way to visually inspect the output while fine tuning the mapping, as any mistake in the mapping will propagate to the output animation during the transfer process. Once satisfied with the posed output we are ready to transfer the animation.
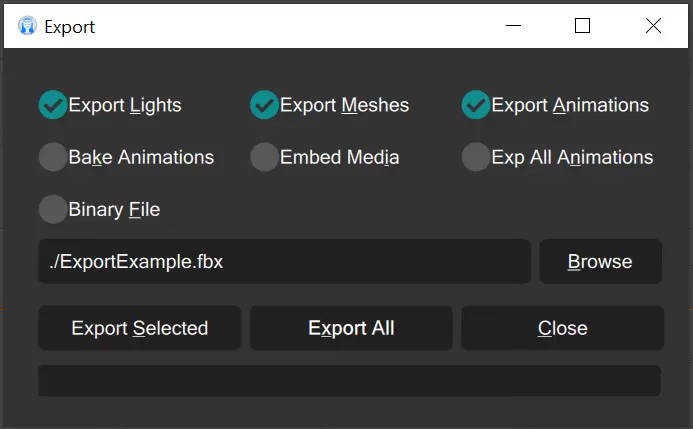
Press “Animation” button under Transfer to bring up the following dialog. The dialog is self explanatory.
![]()
The first option is to transfer the animation within the interval specified by the Ghost/Motion slider while the second option transfers the entire source animation.
There is also an option to minimize character sliding using Inverse Kinematics. This slightly slows down the transfer process, but provides better output in most cases. If you are experiencing excessive shaking in the transferred animation you can choose to uncheck this option. To start the animation transfer simply press the “Start” button and to stop the process mid-transfer use the “Stop” button.
Hiding Joints for better Matching / Retargeting
Sometimes you may encounter skeletons that are vastly different and that do not match with the source or target skeletons. In this case automatic mapping or even manual mapping may not work as multiple Joints lying on the same IK chain can cause re-targeting to fail. In such cases hiding problematic joints can be beneficial. Hidden joints are ignored by the mapping and re-targeting algorithms, making it suitable for cases where skeletons do not match. Simply hide the joints using the TreeView and try mapping and re-targeting again to obtain a better result. An example of such a case is shown in the following short video.
Exporting the output
To export the targeted animation you have two options. The easier option is to simply select all the target joints, choose File->Export (Crtl+E) from the file menu and select the “Export Selected” option as shown below.
The second option is to delete the source scene along with its animation after the transfer has completed. To do this open the TreeView, select the Source scene and press the keyboard “Del” key or the trash button in the timeline, as shown below.
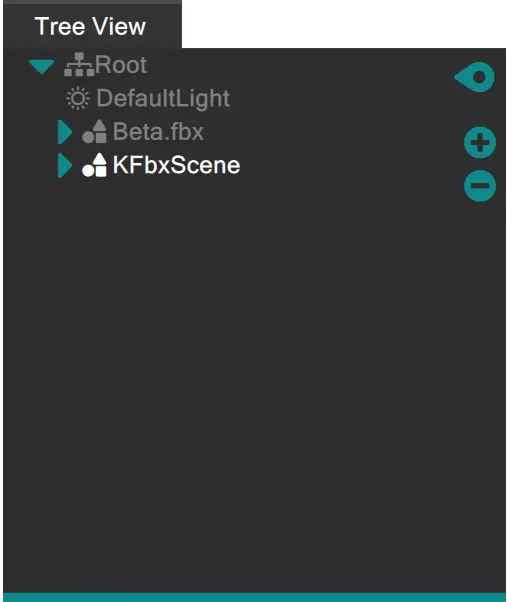
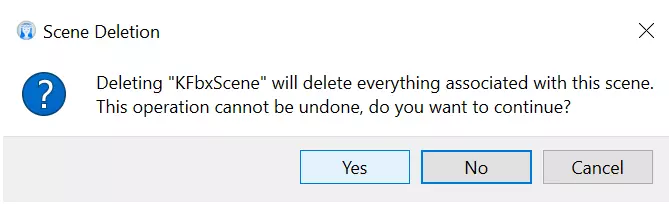
A warning message will appear warning the user that he/she is about to delete an entire scene, choose yes, and the source scene will be deleted (this process cannot be undone). Now you can simply export the scene using the “Export All” option in the export dialog.
Tutorial
The following short tutorial video showcases the retargeting workflow in MotionMuse
Important Notes and Limitations
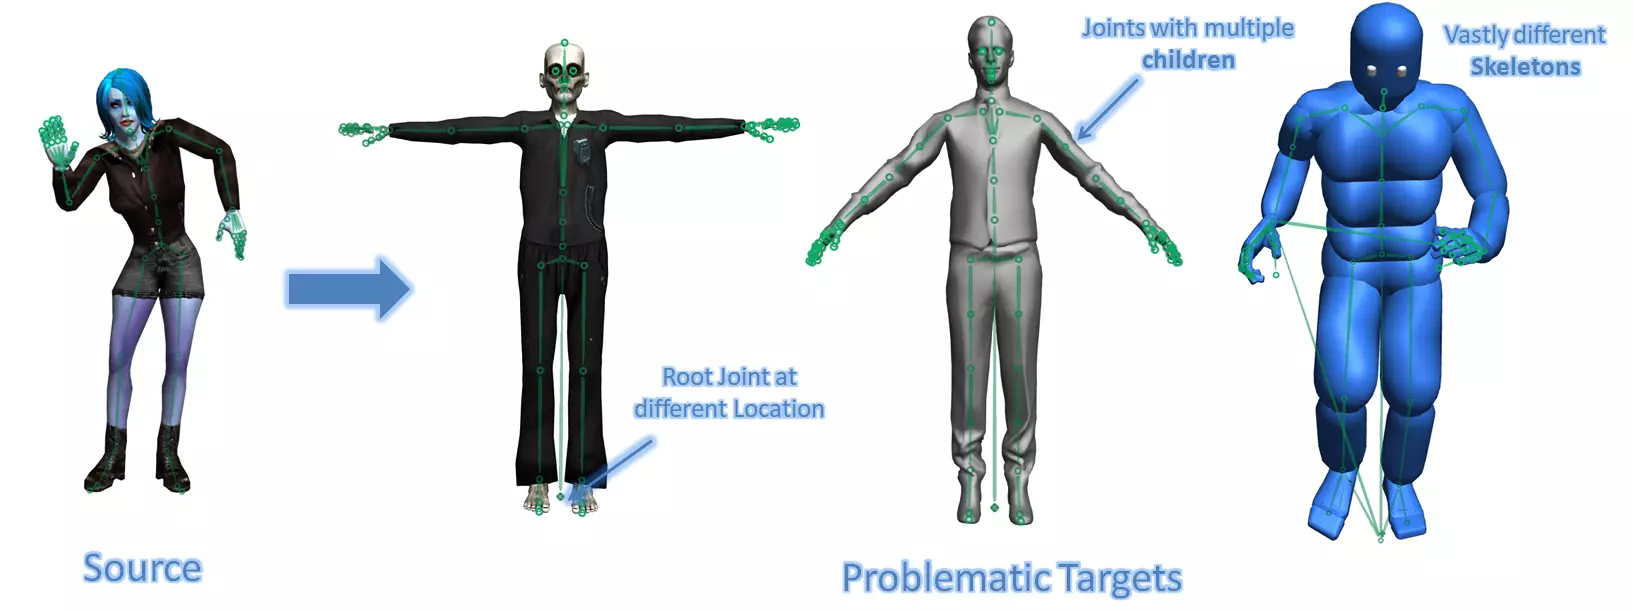
It should be noted that the mapping and retargeting systems do not work on all combination of skeletons. Retargeting may not work in the following cases
- Disconnected Skeletons
- Skeletons where a joint has multiple children on the same chain
- Skeletons that have very different topologies
- Skeletons where the root joints are not in the same place w.r.t other joints
Following image shows the cases where Retargeting might not work correctly.
In addition to this there may be bugs / crashes in the system, as this is a new feature we will keep on fixing bugs and errors as and when we encounter them.
Happy retargeting!